
To build a survey in Google Forms step by step, you start a blank form at forms.google.com, add questions with the right response type, group them into sections, set validation and required answers, then share the link. Responses collect themselves into a linked Google Sheet, so the analysis is built in from the first response.
A basic feedback form takes about ten minutes to build. A multi-section survey with branching and a linked Sheet takes closer to forty. The build is the easy part; the planning you do in the fifteen minutes before you open Google decides whether the data is usable afterwards.
Table of Contents
- 1What You Need
- 2How long should your survey be?
- 3Step-by-Step: How to Build a Survey in Google Forms
- 4Step 1: Plan the Survey Before Opening Google Forms
- 5Step 2: Create a New Google Form
- 6Step 3: Add and Write the Survey Questions
- 7Step 4: Organize the Form with Sections and Page Breaks
- 8Step 5: Set Validation, Logic, and Required Responses
- 9Step 6: Customize the Description and Appearance
- 10Step 7: Preview and Test the Complete Survey
- 11Step 8: Share the Survey and Review Responses
- 12Common Mistakes
- 13Asking a leading question
- 14Asking a double-barrelled question
- 15Forcing every answer to be required
- 16Sending the edit link instead of the response link
- 17Typing into the linked response Sheet
- 18Turning on Limit to 1 response without reading the catch
- 19Building a 40-question form and wondering about the response rate
- 20Putting demographics first
- 21Frequently Asked Questions
- 22Is Google Forms free for students?
- 23Can I collect anonymous responses with Google Forms?
- 24Can I edit a Google Forms survey after sharing it?
- 25How do I limit Google Forms to one response per person?
- 26Can I collect responses when I am offline?
- 27How should I prepare a Google Forms survey for data analysis?
- 28Conclusion
What You Need
You need a Google account and a browser where you are signed in to it. Free personal accounts and paid Workspace accounts both work, and the survey sits in whichever account you build it from, so pick the right one before you start.
You also need a written plan: the survey objective, who you are collecting from, and the questions you actually need answered. A rough draft in a text document is enough, and a linked Google Sheet destination is created for you automatically when responses start.
Decide two things before you build. Will responses be anonymous or tied to signed-in accounts? And how long should the survey take? If you are collecting personal data, health details or anything sensitive, add a consent statement and a named contact, and check whether your institution or organisation has an ethics review step that has to happen first.
How long should your survey be?
Five to ten minutes, roughly fifteen to thirty questions. People disengage once a form runs past that, and a shorter survey usually produces cleaner responses than a long one. Put the demographic questions last, because asking about a respondent’s role before the substantive questions can feel like a filter and pushes people out of the form.
Step-by-Step: How to Build a Survey in Google Forms
The build runs in eight stages. Each one depends on the last, and skipping the planning stage is the mistake that costs the most time later.
Step 1: Plan the Survey Before Opening Google Forms
Write the objective as a single sentence: what decision will this data change? Once the objective is fixed, the question list usually writes itself, and any question that does not serve the objective is a question you can drop before it costs you responses.
Next, list the variables you need. If you are running a class evaluation, that might be overall satisfaction, clarity of explanations, usefulness of materials, and one open comment. Four questions, done properly, beat twenty written on a bus ride.
Order matters more than most people expect. Start with a warm, easy question, group related items together, and save anything sensitive or personal for the end. Include one open-ended question so respondents have somewhere to say what your closed questions missed.
Step 2: Create a New Google Form
Open forms.google.com while signed into the account that should own the form. Click the plus button and choose Blank form, or pick one of the gallery templates if you are starting from a recognised structure like a customer satisfaction survey or a course evaluation.
Blank form gives you full control, and for anything that will be analysed as data it is the better starting point. Templates carry their own questions, and deleting inherited questions is more work than starting clean.
How you tell it worked: the untitled form opens in the editor with a single question block and the purple Google Forms toolbar across the top.
Step 3: Add and Write the Survey Questions
Click the plus button to add a question, then use the type selector to choose how the answer will be captured. Google Forms ships with nine question types, and each one ends up as a column in your response Sheet, so the choice is an analysis decision as much as a design one.
- Short answer – a single word, number or date. Use it for name, age band or postcode.
- Paragraph – free text over several lines. Use it for one or two open comments, not ten.
- Multiple choice – one answer from a list. Use it for satisfaction scales and single-category questions.
- Checkboxes – any number of answers. Use it when respondents may pick several reasons, and never for mutually exclusive options.
- Dropdown – one answer from a collapsed list. Use it when you have many options, such as country or department.
- Linear scale – a numbered row from one endpoint to another. It is the cleanest way to collect a 1 to 5 or 0 to 10 rating.
- Date and time – a date, a time, or both. Use it for deadlines and appointment slots.
- File upload – a document or image from the respondent. Useful for coursework submissions, but it needs storage and privacy thought.
- Image inside a question – a picture shown with the question. Use it for diagram-based or visual tasks.
Write the question text neutrally. A question like “How useful was the workshop?” paired with a linear scale from not useful to very useful gives you a clean number. A question like “How useful and well-presented was our excellent new workshop?” gives you neither, because the wording has already told the respondent how to answer.
Turn on the Required toggle only where a blank would break your analysis. Forcing a respondent to invent an answer or skip a question they do not know about produces data that looks complete and is not.
Use the three-dot menu on a question to add a description, duplicate it, or set a response validation rule. Validation is the cleanest way to keep data tidy: a short answer box can require a whole number between 1 and 10, or an email field can reject anything that is not an email address.
Step 4: Organize the Form with Sections and Page Breaks
Sections are containers with their own header, description and optional image. Add one from the three-dot menu in the question toolbar, give it a short title, and use the section description to tell respondents what is coming and how long it will take.
Sections do more than tidy things up. They give you somewhere to branch to, they let you set required questions per section, and they break a long form into pages a person on a phone can actually finish. On a form of twenty questions, a page break every four or five items makes abandonment noticeably less likely.
Turn on the progress bar in settings so respondents can see how far along they are. It is a small setting, but it tells people the form ends.
Step 5: Set Validation, Logic, and Required Responses
Google Forms does support branching, and this is the step people struggle to find. Add a multiple choice or dropdown question, open that question’s three-dot menu, choose Go to section based on answer, and map each answer option to a section of the form.
So a question like “Have you used the platform before?” can send first-time users to an onboarding section and existing users past it. Set one of the options to move to the next section, and the rest of the mapping follows the same pattern.
Google Forms has no true dynamic questions. A field cannot appear because of something a respondent typed into a text box, and it cannot pull data from another system mid-survey. Section branching is the closest thing it does, and knowing that boundary saves you a lot of searching.
Test every branch before release. Answer the question each way in the preview and confirm you land where you intended, because a mis-set mapping sends respondents somewhere the data does not account for.
In the response settings, you can also turn on Collect email addresses, Limit to 1 response, Edit after submitting, and Accepting responses at a set limit. Read the trade-off on Limit to 1 response before you switch it on: it requires the respondent to be signed into a Google account, which quietly removes everyone who was not already using one.
Step 6: Customize the Description and Appearance
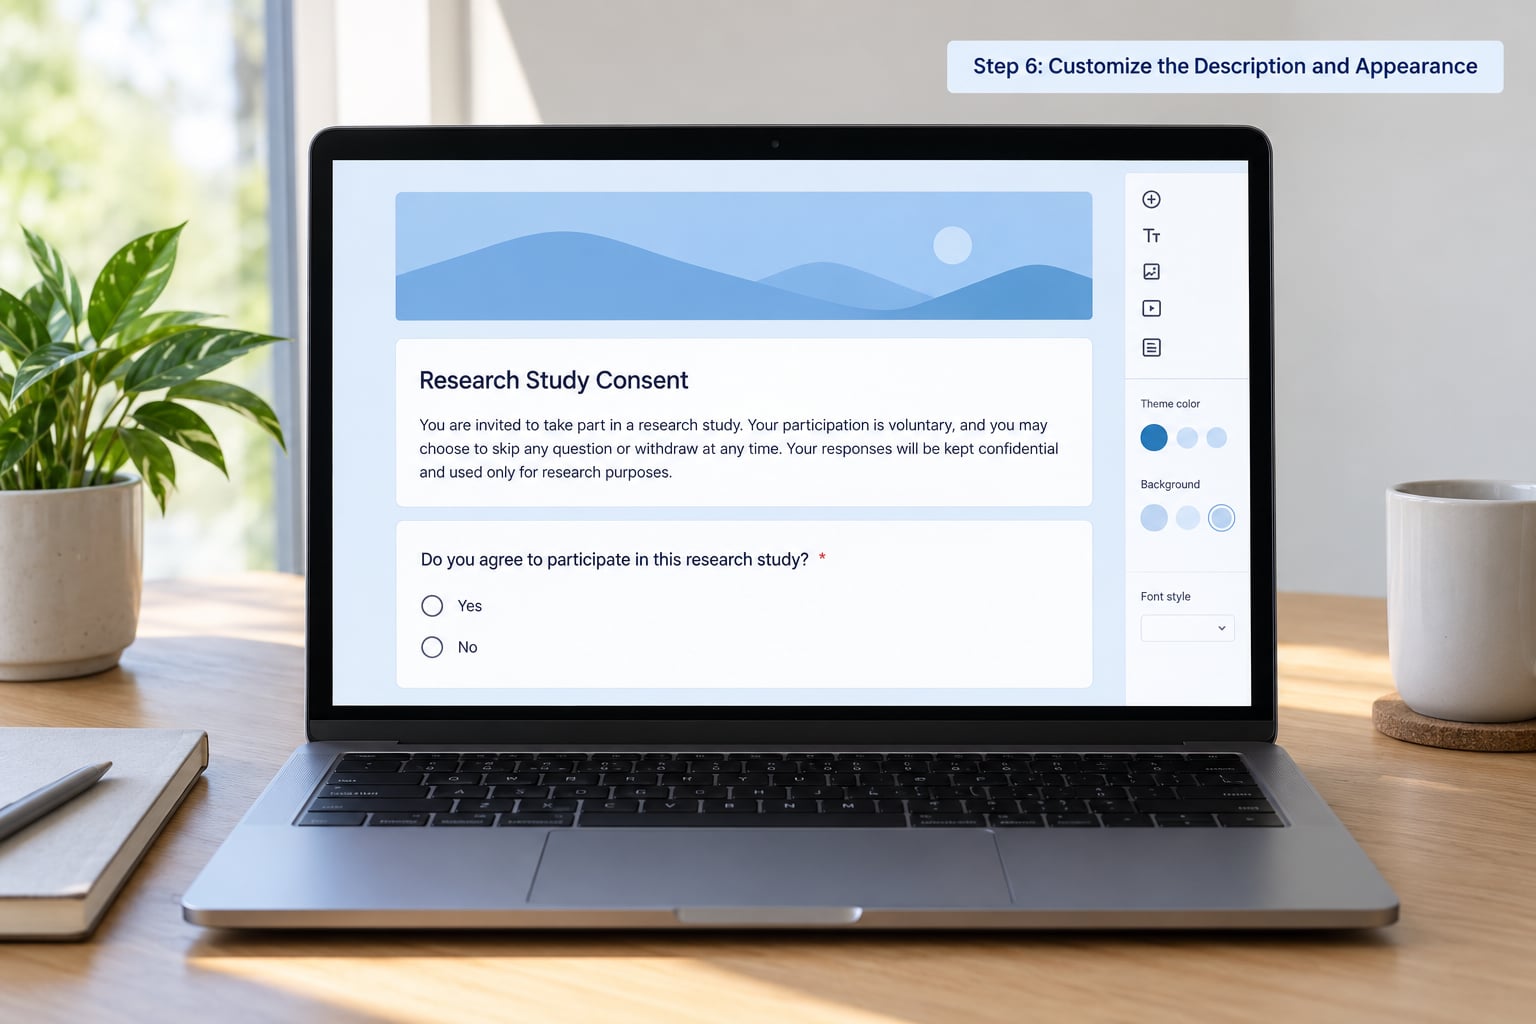
The top of your form is the only place you get to tell respondents what the survey is, why they were asked, and what you will do with the answers. Write the survey title as a plain description of the topic rather than “Survey Form 3”.
In the description, state the purpose in one or two sentences, give the estimated completion time, confirm whether responses are anonymous, and add a contact address for questions. If you are collecting personal data, put a short consent statement there: what you are collecting, why, and that submitting means agreeing to take part.
Then set a theme colour and, if you want one, a header image. Keep it simple. A bright custom banner reads as marketing on a research instrument, and a busy header image pulls attention away from the question at the top of the page.
Step 7: Preview and Test the Complete Survey
Click the preview icon in the toolbar. You will see exactly what a respondent sees, on a clean screen with no editor chrome.
Run through it as a first-time respondent. Check that the wording reads naturally out of context, that required fields actually block submission, that branching sends you the right way, and that the confirmation message at the end is one you want. Then open the form on a phone, because a question with three long answer options looks fine at desktop width and cramped on a handset.
Check that responses are recording. Open the Responses tab and confirm the linked Sheet has a new row, with your question text as the column headers.
Then pilot test it. Send the form to two to ten people who match your target respondents but are not part of the study. Watch one of them complete it without helping, and note every point where they hesitate. The pilot test catches wording problems no amount of rereading will.
Step 8: Share the Survey and Review Responses
Click Share to open the sharing panel. The Send link tab gives you the live response link, and that is the link you send, post or email.
The Embed tab gives you an embed code for a website or landing page, and the link panel also offers a QR code, which is useful for printed flyers or slide decks. The Link tab holds the edit link, and it is for you, not for respondents.
For a distribution you need to control, one link per respondent beats a single open link. Send the link by email through the share panel and Google will track which invitees have responded, which gives you a reminder list for the people who have not.
Responses land in two places. The Responses tab gives you a live summary with per-question charts, and the green Sheets icon creates a linked spreadsheet with one column per question and one row per submission. That Sheet is what you will actually analyse, filter, pivot and export from.
One caution about the linked Sheet: it is generated, so do not type into it. Editing a header or deleting a row breaks the link back to the form, and the errors are hard to spot once you have data flowing in. Make your changes in the form editor or in a copy of the Sheet.
Common Mistakes
Most broken surveys are broken in the same handful of ways, and all of them are fixable without starting over.
Asking a leading question
“How helpful was our excellent new support team?” assumes the answer. Ask “How helpful was our support team?” on a scale and let the numbers tell you what respondents actually think.
Asking a double-barrelled question
“How clear and useful was the course material?” gives one answer to two questions. Split it in two, or accept that the result cannot be untangled later. This is the error instructional design practitioners on r/instructionaldesign warn about most often, alongside duplicate questions and industry jargon that respondents are expected to know.
Forcing every answer to be required
A respondent who does not know cannot help you, and a required field makes them guess. Reserve Required for the questions your analysis depends on, like a scale score.
Sending the edit link instead of the response link
This one catches people constantly. The Link tab on the share panel is your editor access. Copy the link from Send link instead, and paste it into a browser to confirm it opens a fillable form rather than the editor.
Typing into the linked response Sheet
Educators on r/Teachers hit this the first time they find the Sheet, and it is why some forms stop recording. Treat the linked Sheet as read-only. If you need to tidy data, copy it first.
Turning on Limit to 1 response without reading the catch
It stops duplicates, which is good for validity, but it forces every respondent to sign in with a Google account. On a form being shared to students, staff or external participants, that can cost you a large share of your responses.
Building a 40-question form and wondering about the response rate
Survey fatigue is real, and it shows up as abandoned forms and fast-straightening answers. Cut to the questions that serve the objective, then pilot test what is left.
Putting demographics first
Asking a respondent to identify themselves before they know what the survey involves reads like a filter. Demographics belong at the end, phrased plainly, and only if you truly need them.
Frequently Asked Questions
Is Google Forms free for students?
Yes. Google Forms is free with any Google account, including a school or student account, and there is no per-response charge. A paid Google Workspace licence adds custom branding, larger file upload limits and admin controls, but nothing in a standard academic survey requires it. Keep one limit in mind: a linked Google Sheet holds up to 10 million cells, which only matters for very large studies.
Can I collect anonymous responses with Google Forms?
Yes, by default. Google Forms does not record names or emails unless you turn on Collect email addresses in the response settings, or enable Limit to 1 response, which requires respondents to sign in. Leaving both off gives you fully anonymous submissions, though you then cannot identify repeat respondents or follow up with individuals.
Can I edit a Google Forms survey after sharing it?
Yes, and you can keep editing while responses are coming in. Existing responses stay attached to their question columns, so adding a question mid-field adds a new column with blank values for earlier submissions. Be careful with wording changes: if you alter a question after some responses exist, the earlier answers may no longer answer the question being asked.
How do I limit Google Forms to one response per person?
Open the form, click the Settings icon, tick Limit to 1 response, and choose whether respondents must sign in or stay signed in. This is the reliable way to stop duplicates, but sign-in requirements are a real trade-off, because anyone without a Google account can no longer respond at all.
Can I collect responses when I am offline?
Not natively. Google Forms needs a connection to load and to submit, so a respondent without data cannot complete one. For fieldwork in low-connectivity settings, download responses to a linked Google Sheet and accept them on paper or in a locally saved spreadsheet instead, then enter the results into your form or dataset yourself.
How should I prepare a Google Forms survey for data analysis?
Keep every question single-purpose, use a consistent response type per question, and name your scale clearly so a column labelled 1 to 5 is unambiguous. Run a pilot test with two to ten people first. Then work from a copy of the response Sheet, check the column headers match your questions, and decide before you collect data how you will treat missing answers.
Conclusion
Start with the objective and the question list, not with the form. Fifteen minutes of planning, a draft in plain text, and a pilot test with two to ten people will do more for your data than any amount of time spent on the theme.
Then work through the eight stages in order: create the blank form, write neutral questions with the right response type, group them into sections, set validation and branching, write the description and consent line, preview on a phone, then share the send link rather than the edit link. Responses collect themselves into a linked Sheet, and the first row arrives as soon as somebody submits.
That is the whole of how to build a survey in Google Forms step by step. Once responses are coming in, the next job is cleaning that Sheet properly, which is a separate problem worth its own guide.